
さくらVPS Ubuntu 環境で、2つのドメインを管理します。両方ともそんなにアクセスすることを想定していないので、2つのアドレスを1台のサーバー環境で実現します。
1台のサーバー環境に対し、2つのドメインで、別々のホームページを表示させます。
- さくらVPS
- Ubuntu22.04
- Apache2.4.52
- Let’s Encrypt


さくらVPSのネームサーバー設定
まずは、さくらVPSに2つ目のドメインのネームサーバーを設定します。両方のドメインにアクセスしたとき、同じサーバーに接続するようになります。
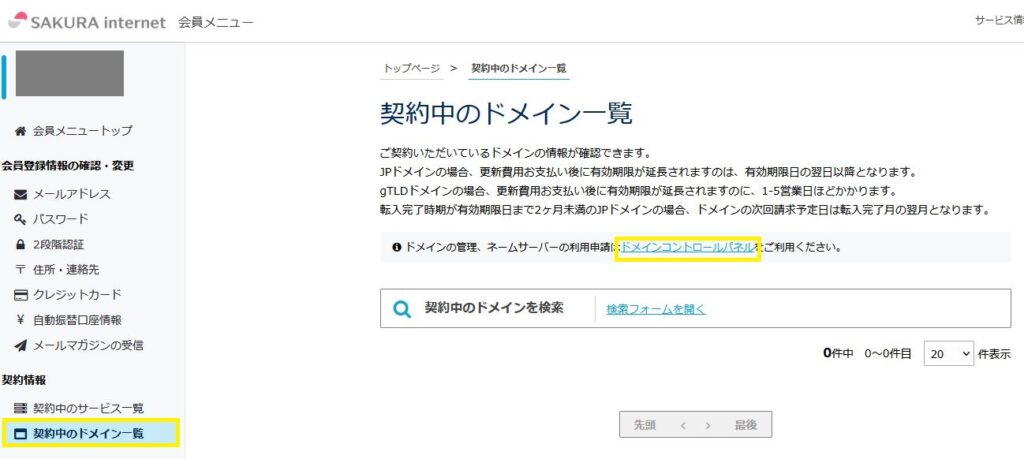
さくらVPSにログインし、左側のメニューで、契約中のドメイン一覧を選択します。その後、ドメインコントロールパネルをクリックします。
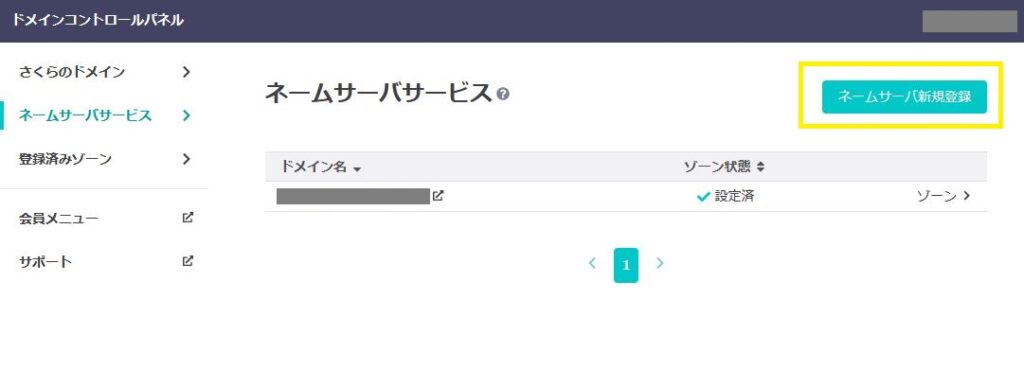
左側のネームサーバサービスを選択し、ネームサーバ新規登録を押します。すでに1つ登録済みなので、2つ目を登録します。
登録したいドメイン名を入力します。

登録できました。次はゾーン設定を行います。↓のリンクの逆引きレコードの設定章と同じことをします。ここでは割愛します。

これが終わった段階で、http://ドメイン名 にアクセスすると、1つ目のドメインと同じページが表示されました。ここから設定を追加していきます。
https でアクセスできるようにする
↓の記事を参考にhttpsで接続するため、無料の証明書Let’s Encriptを使います。
certbotはインストール済みなので、追加の証明書を取得します。
$ sudo service apache2 stop
$ sudo certbot --apache -d 追加するドメイン名
途中の選択肢は、2 : Renew & replace the certificate (may be subject to CA rate limits) を選択します。
これでhttpsでアクセスできるようになります。
apacheの開始コマンドを忘れないように。
$ sudo service apache2 start以下のコマンドで証明書がインストールされたことの確認ができます。
$ sudo certbot certificates httpアクセスのとき、https アクセスにする
1つ目のときは、証明書取得時に自動で設定されました。2つ目以降は、手動で設定する必要がありそうです。まずは、apacheを停止します。
$ sudo service apache2 stopApache2.4 の/etc/apache2/sites-available の000-default.conf を以下のように更新します。
<VirtualHost *:80>
        # The ServerName directive sets the request scheme, hostname and port that
        # the server uses to identify itself. This is used when creating
        # redirection URLs. In the context of virtual hosts, the ServerName
        # specifies what hostname must appear in the request's Host: header to
        # match this virtual host. For the default virtual host (this file) this
        # value is not decisive as it is used as a last resort host regardless.
        # However, you must set it for any further virtual host explicitly.
        #ServerName www.example.com

        ServerAdmin webmaster@localhost
        DocumentRoot /var/www/html/

        # Available loglevels: trace8, ..., trace1, debug, info, notice, warn,
        # error, crit, alert, emerg.
        # It is also possible to configure the loglevel for particular
        # modules, e.g.
        #LogLevel info ssl:warn

        ErrorLog ${APACHE_LOG_DIR}/error.log
        CustomLog ${APACHE_LOG_DIR}/access.log combined

        # For most configuration files from conf-available/, which are
        # enabled or disabled at a global level, it is possible to
        # include a line for only one particular virtual host. For example the
        # following line enables the CGI configuration for this host only
        # after it has been globally disabled with "a2disconf".
        #Include conf-available/serve-cgi-bin.conf
        RewriteEngine on
        RewriteCond %{SERVER_NAME} ='ドメイン名" [OR]
        RewriteCond %{SERVER_NAME} ='2つ目ドメイン名"
        RewriteRule ^ https://%{SERVER_NAME}%{REQUEST_URI} [END,NE,R=permanent]
</VirtualHost>
http://( 1つ目または2つ目 ドメイン名)にアクセスしたとき、https://(1つ目または2つ目ドメイン名) にリライトします。
httpsアクセスしたときの適用
Apache2.4 の/etc/apache2/sites-available の000-default-le-ssl.conf を修正します。
<IfModule mod_ssl.c>
<VirtualHost *:443>
  - 略 -
  DocumentRoot /var/www/html  # 1つめのドメインの参照先
  - 略 -
  ServerName ’ドメイン名’
  SSLCertificateFile /etc/letsencrypt/live/’ドメイン名’/fullchain.pem
  SSLCertificateKeyFile /etc/letsencrypt/live/’ドメイン名’/privkey.pem
  Include /etc/letsencrypt/options-ssl-apache.conf
</VirtualHost>
<VirtualHost *:443>
  - 略 -
  DocumentRoot /var/www/html2  # 2つめのドメインの参照先
  - 略 -
  ServerName ’2つ目のドメイン名’
  SSLCertificateFile /etc/letsencrypt/live/’2つ目のドメイン名’/fullchain.pem
  SSLCertificateKeyFile /etc/letsencrypt/live/’2つ目のドメイン名’/privkey.pem
  Include /etc/letsencrypt/options-ssl-apache.conf
</VirtualHost>
</IfModule>
今後、2つ目のドメイン名のVirtualHost に設定を追加することになります。
同ファイルのDocumentRootを変更することで、ルートにアクセスしたときの、読み込み先を変更することができます。
最後に、apacheを起動します。
$ sudo service apache2 stopこれで、2つのドメインでアクセスしたとき、1台のサーバーの別々の場所にアクセスできます。


コメント