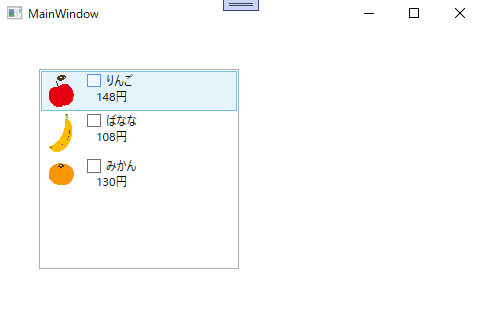
本記事では、C# WPFアプリケーションにて、ListBoxの項目を画像やチェックボックスでカスタマイズする方法を書きます。
カスタマイズするには、ListBox.ItemTemplate タグ→DataTemplateタグ の内部を設定します。画像、チェックボックスなどもListBoxの項目に含めることができます。
開発環境
- Windows10
- Microsoft Visual Studio Community2022
- .NET 6
- WPF アプリ
目次
設定方法
Xamlファイルは以下のように設定します。
<Window x:Class="ListBoxProject.MainWindow"
        xmlns="http://schemas.microsoft.com/winfx/2006/xaml/presentation"
        xmlns:x="http://schemas.microsoft.com/winfx/2006/xaml"
        xmlns:d="http://schemas.microsoft.com/expression/blend/2008"
        xmlns:mc="http://schemas.openxmlformats.org/markup-compatibility/2006"
        xmlns:local="clr-namespace:ListBoxProject"
        mc:Ignorable="d"
        Title="MainWindow" Height="450" Width="500">
    <Grid>
        <ListBox x:Name="ListBox_FriutsList" VerticalAlignment="Top" HorizontalAlignment="Left" Width="200" Height="200" Margin="40,40,0,0" d:ItemsSource="{x:Null}" SelectionChanged="ListBox_SelectionChanged">
            <ListBox.ItemTemplate>
                <DataTemplate>
                    <StackPanel Orientation="Horizontal">
                        <Image Source="{Binding _imagePath}" Width="30"/>
                        <StackPanel Orientation="Vertical" Margin="10,0,0,0">
                            <CheckBox Click="CheckBox_Click">
                                <TextBlock Text="{Binding _name}"/>
                            </CheckBox>
                            <TextBlock Text="{Binding _price}" Margin="10,0,0,0" />
                        </StackPanel>
                    </StackPanel>
                </DataTemplate>
            </ListBox.ItemTemplate>
        </ListBox>
    </Grid>
</Window>
ListBox.ItemTemplate タグ→DataTemplateタグ の内部に、Imageタグ、CheckBoxタグを設定します。
xaml の相互作用のcsファイルです。
using System.Collections.ObjectModel;
using System.Windows;
using System.Windows.Controls;

namespace ListBoxProject
{
    /// <summary>
    /// Interaction logic for MainWindow.xaml
    /// </summary>
    public partial class MainWindow : Window
    {
        private static ObservableCollection<Fruits> FruitsList = new ObservableCollection<Fruits>()
        {
            new Fruits( "apple", "りんご", "Resources/apple.png", "148円"),
            new Fruits( "banana", "ばなな", "Resources/banana.png", "108円"),
            new Fruits( "orange", "みかん", "Resources/orange.png", "130円"),
        };

        public MainWindow()
        {
            InitializeComponent();

            ListBox_FriutsList.ItemsSource = FruitsList;
        }

        /// <summary>
        /// フルーツ
        /// </summary>
        private class Fruits
        {
            public string _id { get; set; }

            public string _name { get; set; }

            public string _imagePath { get; set; }

            public string _price { get; set; }

            public Fruits(string _id, string _name, string _imagePath, string _price)
            {
                this._id = _id;
                this._name = _name;
                this._imagePath = _imagePath;
                this._price = _price;
            }
        }

        /// <summary>
        /// アイテムクリック
        /// </summary>
        /// <param name="sender"></param>
        /// <param name="e"></param>
        private void ListBox_SelectionChanged(object sender, SelectionChangedEventArgs e)
        {
            int selectedIndex = ListBox_FriutsList.SelectedIndex;
            if (selectedIndex != -1)
            {
                return;
            }
            string id = FruitsList[selectedIndex]._id;
        }

        private void CheckBox_Click(object sender, RoutedEventArgs e)
        {

        }
    }
}- FruitsList を、ListBoxに設定します。
- Fruitsクラスのメンバ変数名は、XamlのListBox のBindingの名称と一致させます。
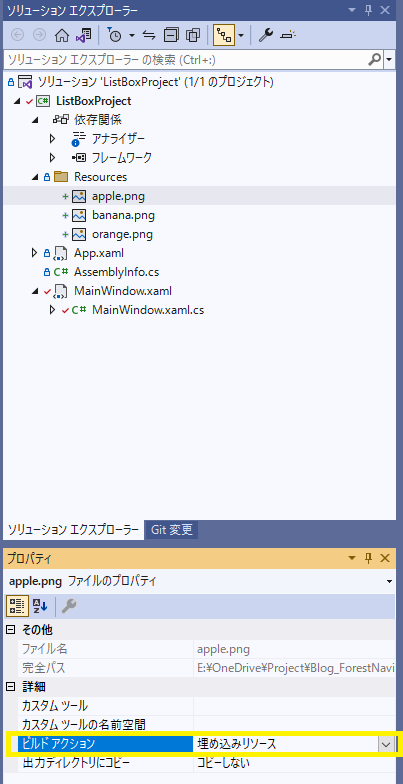
画像は、Resources フォルダに追加しました。
画像のプロパティのビルドアクションはリソースとしておきます。
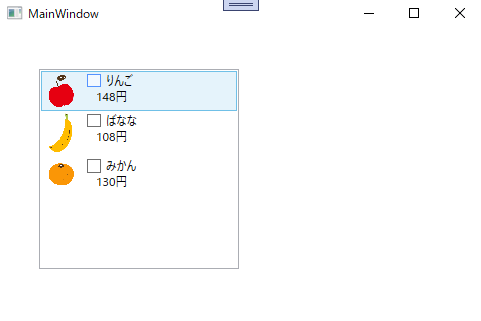
プロジェクトを実行したら↓のように表示されました。ListBoxの項目に、画像やチェックボックスを表示できました。
まとめ
C# WPFアプリケーションにて、ListBoxの項目を画像やチェックボックスでカスタマイズする方法を書きました。
カスタマイズするには、ListBox.ItemTemplate タグ→DataTemplateタグ の内部を設定します。画像、チェックボックスなどもListBoxの項目に含めることができます。






コメント
コメント一覧 (1件)
Nice post. I was checking continuously this weblog and I am inspired!
Extremely helpful info specially the last section 🙂 I handle such information much.
I used to be looking for this certain info for a long time.
Thank you and best of luck.